Sunday 28 October 2012

UK and USA Crochet Terms

I sat down a little while ago to crochet a hat from a pattern I recently found at a charity shop. I quickly got very confused about what I was doing and what I was stitching and what I was supposed to be stitching. Hm. Then I took a second to think. I know that crochet hooks are different in the USA and UK. I know that crochet yarn weight is slightly different in the USA and UK. Ah hah! I bet the crochet terms are also different. I checked it out and it is so.


I made this UK vs USA crochet stitch chart for my own future reference and thought I'd post it in case anyone else might stumble upon my blog with the same problem I encountered tonight. I'll continue to update it if I come across any other terms that are different...and if you know any, please let me know. Thanks!


Follow my blog with Bloglovin

Wednesday 24 October 2012

Ladybug Taggie Blanket Tutorial

Let me begin by saying that I completely failed at kcwc. Oh, well. At least I got my little girl's nightgown made and started on my little guy's pajamas that should get finished this next week. The last few days, I have been working on Halloween costumes (cowboy & cowgirl) and quickly made this ladybug taggie blanket for a friend who's going to have a baby soon.


 I thought I'd make a tutorial for this one because it is so easy and I think just about anyone who knows even a little about sewing could make it. Here's what you'll need: 

paper, pencil
ribbon
fabric scraps (I used fleece and an old t-shirt)
2 round objects to trace (I used a plate and a bowl)
the usual sewing supplies: thread, scissors, pins, sewing machine


Step 1: Trace the largest circle and the overlapping smaller circle. 
Step 2: Use the larger circle to trace the bottom of the ladybug's head. 
Step 3: Sketch within the ladybug shape to get an idea of what your ladybug will look like. 
Step 4: Cut the entire ladybug shape out of fabric color A (polka-dot fleece).
Step 5: Cut the entire ladybug shape out of fabric color B (black t-shirt).
Step 6: Cut the head shape out of fabric color B (black t-shirt).


Step 7: Sew a black ribbon (or other color) to the center length of the fleece.
Step 8: Sew the head to the color A body (fleece).


Step 9: Cut 5 inch of each ribbon length. I cut 8 total (6 legs and 2 antennae). Fold them in half and pin to the ladybug color A (fleece). Make sure the folded edge is pointing toward the centre of the ladybug body.
Step 10: With right sides facing, place the fabric color B (black) over the ladybug shape and pin in place. The ribbons should be sandwiched between the two fabric pieces.


Step 11: Sew around the edge and leave a three-inch gap so that you can turn the ladybug right side out.


Step 12: Turn the ladybug right side out. Tuck the 3-inches in and topstich around the entire ladybug edge.
Step 13: Sew over the edge of the center ribbon and the bottom edge of the head. This will hold the front and back together and will also create a design on the bottom of the ladybug. And you're done!
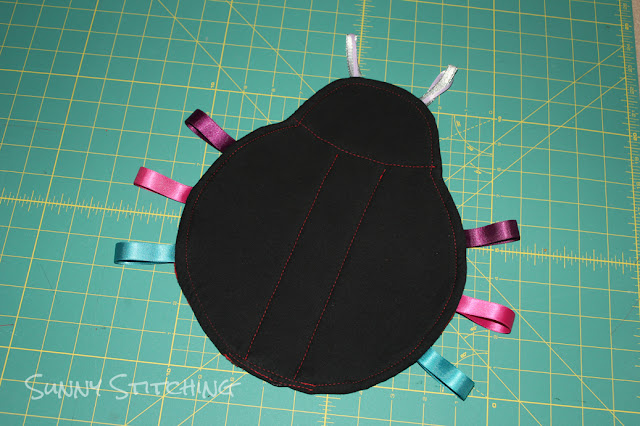

BOTTOM


TOP


Tuesday 9 October 2012

KCWC: Strawberry Pajamas


KCWC is Elsie Marley's challenge to sew kids clothes for one hour a day for a week. I'm counting yesterday's kcwc project for two days. Yesterday, I sewed for 3 hours. And today we had to be out of the house all day so that our new boiler could be installed (yay! heating! hot water!) so sewing was not at all possible. 

I am so pleased with how my little girl's nightgown turned out and learned by making it that I need to take a little more care when I follow patterns. I used a pattern that my mom shipped me from California, McCalls Pattern M4963, and I cut out a size 5-6 for my 4-year-old. The other option was a size 3-4. I assumed the smaller size would be too small. I didn't take any measurements to confirm. Oops! As soon as I began sewing the pieces together I realised the nightgown was going to be HUGE...and it was. You can see what the nightgown should have looked like on my mom's blog, Jerry and Kay. She made a really nice one for my niece - it fit perfectly.


After I sewed it all together, the seriously fun part began because I had to get creative in order to figure out a way to make the nightgown fit. I ripped the stitches from the neck facing, turned it up, and gathered the edge. Fortunately, it worked. Now the neck doesn't fall off her shoulders. This was my lazy way of not creating more work for myself than I already had...and I love how it turned out!  


After fixing the neck, I cut a few inches off the sleeves and gathered them with elastic. I was so eager to finish that I decided not to hem the sleeves. Easy. Then I used some of my extra fabric to make a ruffle for the bottom...this was in an effort to make this nightgown resemble her favorite purple nightgown that Nanny made. Once again, no hemming. And done.


After trying it on for the 11th time, it seemed to work...so much that I think she forgot she had it on, went right back to playing and left it on until the next morning.


The next morning, she said she felt like a princess when she went to sleep and she was so warm that she didn't even need her blue blanket (sorry Aunt Mary) and she only needed her quilt...this may have been the first night of her life that she didn't sleep with the blue blanket.


Tuesday 2 October 2012

Kids Clothes Week Challenge (kcwc) - can I do it??

I've known and enjoyed browsing Elsie Marley's kids clothes week challenge (aka kcwc) for the last few seasons. It is a challenge to sew an hour a day for a week...and to only sew for your kids (or grandkids...or great grandkids...and so on). This year, I'm going to attempt to participate. I think I can just barely squeeze it in to my schedule and put off cleaning the house for another week. I have a list of items I've been wanting to sew for my kids for a while, but haven't gotten around to doing yet. So, next week, October 8-14, is my week to get it done!

Here are some of the things I hope to accomplish. I have no idea how quickly I'll be able to sew and have probably put too much on my list, but we'll see how it goes...


Oct 8 - pajamas for my little girl...she fell in love with a strawberry print fleece at our little local fabric store a couple weeks ago, so she'll get some cozy pjs out of it.

Oct 9 - pajamas for my little girl...hope to finish!

Oct 10 - pajamas for my little boy...going to try the pajama pattern from sewing for boys or these ones if I feel any time pressure.

Oct 11 - pajamas for my little boy...hope to finish!

Oct 12 - tie shirt for my little boy...from see kate sew - thought it would be cute on a long sleeve shirt.

Oct 13 - halloween costumes...begin and hopefully finish an autumn princess dress...still coming up with a plan for this one and the next!

Oct 14 - halloween costumes...begin and hopefully finish an autumn prince costume OR finish the autumn princess. If I don't finish the halloween costumes, I'll at least have them started so they won't be a totally last minute project like last year.

I'm really excited for a week dedicated to sewing! If you're interested in participating, stop over at Elsie Marley for all the details...and stay tuned to see how I do!

Related Posts Plugin for WordPress, Blogger...