Pages

Wednesday, 19 December 2012

Sheila's Scarf


This will probably be my last post until after Christmas because I'll be flying home tomorrow! Before I travel, I want to share this crochet ribbed scarf that I made for my friend who has been like family and loves my kids! 


It's one of my first few attempts at making something without a pattern and I'm really enjoying the freedom to begin designing my own. The first was a crochet mug cozy that you can see here.


While I was crocheting the scarf, I put it around my neck after the first few rows to check the length and it was way too short, so short it would have fit my little girl! So, I frogged it and started again with a longer chain. 


 I think it turned out really cute and I like the color combo which is similar to a baby blanket I crocheted a few months ago. I just love how the pink pops...a great way to brighten up the winter months!


 Have a Merry Christmas!


Saturday, 15 December 2012

Nanny's Fudge


A few days after I made some delicious-dairy-free-chocolate-peanut-butter-fudge (phew...that's a mouthful), I made some chocolate fudge. My mom sent me a fudge recipe that my Nanny made when my mom was a child, the same fudge recipe my mom made for us when we were children. Of course, being my disorganised and scattered self, I started to make it and then realized that I didn't have any evaporated milk. I had used it in an extra pumpkin pie. But I did have almond milk in the fridge, so I gave it a try and it worked...deeeelicious. Another delicious dairy free fudge! Mmm...mmm.


Four Way Christmas Fudge Recipe

Ingredients:
1 jar marshmallow cream
1 1/2 cups sugar
2/3 cup (158 ml) evaporated milk (or almond milk)
1/4 tsp salt
12 oz (340 grams) semi-sweet chocolate pieces (Green & Blacks Organic - Yum!)
1 tsp vanilla
1/4 c (57 grams) butter or margarine


How to make the fudge:
Combine marshmallow cream, sugar, evaporated milk, butter and salt in a large saucepan.
Bring to a full all over boil, stirring constantly.
Continue to boil over moderate heat, stirring constantly for 5 minutes.
Remove from heat; Stir in semi-sweet chocolate pieces and vanilla; beat until smooth.
Turn into greased 8-inch square pan.
Chill in refrigerator until firm.
Cut into squares.
 
Makes approximately 2 1/8 lb.


Monday, 10 December 2012

Hat & Circle Scarf


It's been cold. This cold has inspired me to make a couple warm items. I became obsessed with this circle scarf a few nights ago and stayed up way too late to finish it. Not the best timing since I'm in the process of weaning myself off caffeine! I'm down to one cup of green tea. This is huge because a few weeks ago I was drinking two cups of coffee and often a cup of tea, too, on a daily basis. This will be a short rough tired patch, but I know I'll feel much better for it!


Back to the cowl...I mean circle scarf (aaah, caffeine I miss you)...I love it. It's really cozy and pretty and it's black which means it can be worn with just about anything. I made this one for my shop, SunshineMakings. I really want to make one for myself, too. :-)


I also made this cute plum purple hat weeks ago, and then forgot about it. For some reason, I remembered it while I was crocheting the circle scarf and pulled it out. 


If you want one of these or anything else from Sunshine Makings, I'm offering a discount to anyone who reads my blog! Just enter the code SSBLOG and you'll receive a 10% discount off any item in the shop now through December 16th. Happy Christmas!


I'm linking up to these fabulous parties!

Friday, 7 December 2012

Christmas CAL

As I was just typing my post title, I had a happy thought: CAL...ifornia! I can't wait to be there for Christmas. Just a few more weeks of grey, wet, freezing cold and then I'll be home for Christmas!

                                 Source: dezeen.com via Jessica on Pinterest


Now, here's what the Christmas CAL (crochet-a-long) is really about. It's at A la Sascha. Anyone can join in. For each day of the CAL, she posts a pattern for a cute festive design. You can either use each one as its own individual ornament, or save them all to make a garland at the end of the CAL.

The first day showed how to crochet a Christmas Fawn:


The second day showed how to crochet a Christmas Bell:


So far, so good! I love these crochet ornaments because they are so quick and it's also a great way to use up yarn scraps. I'm excited to see what's next.

p.s. the sun just started to break through the clouds!


I'm linking up to these fabulous parties!


Wednesday, 5 December 2012

Dairy Free Fudge

So, we recently figured out (in June) that my little boy has a dairy allergy. It hasn't been too difficult to adjust our diet or how I cook...until Thanksgiving when I realised he couldn't eat Libby's Pumpkin Pie! Fortunately, I found a decent dairy free pumpkin pie recipe. Phew!

Now, it's Christmas. We like fudge. All four of us. A lot. 

I got my mom's recipe that was originally my Nanny's so that I could make some fudge with the kids. Of course, it has dairy. So then I did a quick hunt for a dairy free fudge recipe and found this: Really Nice Dairy Free Fudge from Gluten Free on a Shoestring. I am still going to make my Nanny's fudge, but I wanted to make the dairy free fudge first so that my little guy wouldn't miss out. 


It took a little longer to firm up than stated in the recipe, but that is not a big deal at all. It is pure chocolatey, peanut-buttery deliciousness...at least I and my two kids think so. King Damascus can't stand it. He can't stand the taste of coconuts (unless he's just cracked open their shell) or even a hint of the flavor (like me with bananas). But he'll enjoy the next batch when I use my Nanny's recipe. For now, I'll enjoy this dairy free fudge with my two little ones. 


More for me...and my hips.


I'm linking up to these fabulous parties!

Tuesday, 4 December 2012

Pinned It & Did It - Christmas Tree Skirt

My Christmas tree skirt...

Christmas tree skirt that I pinned...
Pinned via pinmarklet from curbly.com


I pinned a few Christmas tree skirts on my Christmas board because I knew I wanted to make one this year. The last few years, I've wrapped random pieces of fabric or table cloths around the skirt, but I really wanted a Christmas skirt that was special, festive, and one that we can use each Christmas to come. 


So, I followed this tutorial by CraftMel on Curbly. It was very clear and easy to follow. The most difficult part in making this Christmas tree skirt was choosing a snowflake design. I took about three days looking at differenty types of snowflake designs, and then cut out about ten (from our recycle paper) before finally settling on this one...


Cutting it out of the large piece of felt wasn't too bad and would have been much easier if I hadn't had four three-to-five-year-olds playing in the room, me constantly saying, "Remember, don't step in the hot lava!!" lava=felt 


I made one small, time consuming change to the method of making the Christmas tree skirt. Since I really want to use it year after year, and also because I have children running & playing around the tree from time to time, I decided to sew the white snowflake to the red circle. Lots of pins and three days of sewing for short periods of time and I finally finished!


We had our tree for two days without a skirt. It's much warmer now...and prettier.


I'm linking up to these fabulous parties!

I'd love for you to follow my pinterest board.
”Follow


Monday, 3 December 2012

Snowman & Santa


 I had so much fun crocheting these cute little snowman and Santa Christmas ornaments. 


 Some for Sunshine Makings...some for me! 


I just love the process of creating these little guys and watching them come to life when they were originally just a ball of yarn. 

I especially loved the crocheted snowman and took lots of pictures of him. 
'Tis the Season!


I'm linking up to these fabulous parties!

Thursday, 29 November 2012

Crochet Bow Hat

Our school just finished a collection of shoe boxes fill with gifts for boys and girls around the world. It's for Operation Christmas Child run by Samaritan's Purse and is such a blessing to us who are able to give to underprivileged children. We basically filled a wrapped shoebox with gifts for a child in a specific age group. 


My own kids helped me fill two boxes, one for a boy aged 2-4 and the other for a girl of the same age. After shopping around on Sunday, we had almost filled both boxes but there was still some room in the girl's. So, I made her a hat and scarf set.


I had my son try it on to make sure it would fit (my little girl was at school). He wasn't too happy about it...he's into 'scary' things at the moment, not pretty pink things. In the end, I snuck the hat on him and quickly snapped a picture. It fit.


I used a pattern from Vallieskids. It was a very quick and easy project. I fell in love with the "butterfly" that was near the edge of the hat. I altered it slightly to make it look more like a bow.


I crocheted the scarf without a pattern, with double crochets. I left an opening after I had most of the length so that the end can slide through and secure the scarf on the neck (does that even make sense??). I love it when my kids' scarfs do this so they don't fall off and I don't have to tie them. I wanted to make a similar "bow" on the scarf but ran out of yarn. I was lucky that the amount I had was enough to finish the scarf and I'll try the bow embellishment on a scarf another day.


I really enjoyed making this set and found it a nice time to pray for the little girl and boy who would be receiving our gifts.


I'm linking up to these fabulous parties!


Wednesday, 28 November 2012

Crochet Cup Sleeves

We've got two new items listed in our shop, Sunshine Makings. They are green and pink crochet cup sleeves. They very bright and cheerful, made by a bright an cheerful lady - my mom, of course! She blogs at Jerry & Kay


These are the best way to keep your fingers from getting burned and, better yet, they are a great help to the environment. Think of all those double cups and cardboard sleeves that won't be used when these crochet cup sleeves are used instead. They're also way cuter!


We've got two colors of the crochet cup sleeves in Sunshine Makings, but are open to special requests and all the colors of the rainbow. 


I'm linking up to these fabulous parties!

Thursday, 22 November 2012

Happy Thanksgiving!

Happy Thanksgiving! I am beginning my day with the smell of pumpkin pie baking in the oven and can't wait to eat some more delicious food tonight! I am so thankful for all that God has provided for us today and everyday: my children, my husband, my family, job, talents, opportunities, I could go on an on...

But for now, here are a few turkey themed crochet items & projects that I've stumbled across today:


Enjoy your turkey!


Tuesday, 20 November 2012

Sunshine Makings: new etsy shop

I am so excited to announce that my mom and I have just opened our Etsy shop: Sunshine Makings! This has been a goal of mine for the last two years and when my mom mentioned making some things for my 'future' shop we realised how special it would be to have a shop together. It is thrilling to have just pushed the key on my keyboard that sent the shop into existence. We would love for you to visit Sunshine Makings and share in our excitement.

For now, here is a peek at what we've got in our shop:

You might remember reading about my lavender harvest a few months ago. Well, I've used the lavender in these lovely relaxing eye pillows.


These cheerful mug cozies made by Kay (my mom) are great for keeping a cup of coffee, tea or hot cocoa warm.


Who can resist amigurumi? I love making these cute little animals like this little mouse and elephant that you may have seen here.


My absolute favorite is this baby blanket. It is so soft and I love the combination of colors.
I would keep it if I still had a baby. :-)


I hope you enjoy this small peek into our shop! I'll be announcing here when more items become available.


I'm linking up to these fabulous parties!


Thursday, 15 November 2012

Pumpkin & Ginger Soup


King Damascus (otherwise known as Chong, my husband) helps out in our school & community garden which is where we got our jack-o-lantern pumpkins. We had one little one left and I've been saving it to make some pumpkin soup. Since our lives have been busy most evenings with work and other obligations, we rarely have a home cooked dinner together. However, things have changed this week and this pumpkin soup was dinner number 2 of 3 that we've had cooked in our kitchen, at home, together. That was the first leaf I put on our thankful tree.


I used a wonderful recipe from Riverford Organic Farms which is where we get our fruit and vegetable deliveries every week. I followed the recipe with just a few changes to meet our needs. First, I left out the milk. Second, I added a lot more honey than the recipe called for because we all have a sweet tooth. I also thought that might help my little girl eat it. She currently doesn't like soup.


Here's the recipe which you can also find here with the original honey amount.

Ingredients:
2 tbsp olive oil
1 tbsp butter
1 onion, roughly chopped
1 kg (2.2 lb) pumpkin, peeled, deseeded & diced
5 cm piece of fresh ginger, peeled & finely chopped
2 tbsp (10ml or 2 tsp) honey
1 ltr (34 fl oz) vegetable or chicken stock
sea salt & ground black pepper
sprinkling of nutmeg

Directions:
Heat oil and butter in a large pan. Add the onions and cook on medium heat for about 8-10 minutes, stirring occasionally. Do not let the onions brown. Add pumpkin, ginger, honey and stir. Add stock, bring to a boil, and simmer for 20-25 minutes or until pumpkin is tender. Puree in a blender. Reheat, season, and serve with a sprinkling of nutmeg.


King Damascus loved it. Little guy liked it until he realized his sister didn't. Little girl hated it.

I also loved it and will be making it again with the other two pumpkins that are waiting in our kitchen. Maybe my little girl will like it next time!


I'm linking up to these fabulous parties!
fall link party

Wednesday, 14 November 2012

thankful tree made for free


I've seen thankful trees all on more than a few blogs that I follow, all over pinterest, and even have a friend or two with some sort of thankful tree in their home. At first, I must admit that I found the idea a little silly. Do we really need to have a tree for every holiday?? But after thinking about the real purpose of the tree and how it can be used to remind ourselves and our children to be thankful on a daily basis, and not just one day, I decided to get my kids involved and make our own thankful tree. 


I thought about different ones I've seen online, but really didn't want to spend any money on decorative crafting supplies, so I took a quick look around the kitchen and spotted an empty protein powder can. I've been making smoothies for breakfast since summer and have gone through quite a few cans. Some have been transformed into marraccas, some into drums, one stores my little boy's dinosaurs, and I was delighted to use another for the thankful tree. The whole method of making the thankful tree was so easy, kid friendly, and didn't cost a penny. If you'd like to make your own (it's not too late!) take a look around your own living space and see what you can upcycle. Here's how we did ours...

Supplies:
paint
empty can/container
sticks from the back garden
small rocks from our gravel driveway
packing paper or any other paper ready to be upcycled
paper clips from or other bendy wire for hanging leaves
(my other idea was to modpodge with packing paper, but decided on paint in the end because it's more fun for my kids)


Easy Peasy Steps:
(1) Find a can/container.  (2) Arrange sticks & fill with small stones/rocks.  (3) Paint the can.


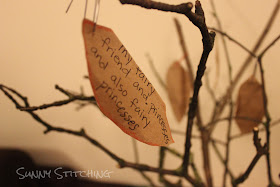
(4) Cut leaves out of paper.  (5) Write things you are thankful for on the paper.  (6) Poke a paperclip through the top of the leaves and hang them from the tree.


We are cutting out leaves and hanging them each night with something new for which we are thankful. It's nice to watch our little thankful tree grow leaves while the leaves outside continue to fall. 


I'm linking up to these fabulous parties!

fall link party
Nap-Time Creations