Pages

Friday, 27 July 2012

Friday Foto - Wisley 2 (30 of 52)


We had a really nice visit to Wisley a few days ago - took a picnic, planted some seeds, and enjoyed the beauty of God's creation. 

I can't take credit for this picture because King Damascus took it. This plant was so beautifully interesting. I love it's shape and color.

Wednesday, 25 July 2012

Transfer Tutorial

If you've seen my blog in the last week, you've probably seen my surfboard sign tutorial for this...


and these...


Well, now I have a moment to show you how to transfer a picture onto the surface of the surfboard. You can also use this method to transfer pictures onto all sorts of other surfaces for endless crafts and projects. Here's how I did it...
 First, I sketched a picture. Then I turned the paper over and used the side of the pencil to cover the entire paper (or at least the area of the paper that the drawing was on).
 Next, I decided where I wanted to place the picture on the surfboard and then taped it in place.

 Then I firmly traced over the original drawing.

When I peeled off the tape and lifted the paper, my picture was now on the surfboard and ready to paint! An easy peasy way to eliminate dark pencil and/or eraser marks on a surface that you'd like to be clean. :-)

Guest Post at Sumo's Sweet Stuff

I'm excited to be guest posting at Sumo's Sweet Stuff today. I'd absolutely love it if you head on over and take a look!


Sumo's Sweet Stuff

I'm sharing how I made these Olympic Rings T-shirts...


New Button

I made a button tonight! I was in a creative mood, but didn't feel like crocheting or sewing or any of my other creative outlets. So instead I played in Photoshop, re-designed my header and made this cute little button...


Photobucket


And since I'm new to all this html language, I found a really clear explanation here on how to add it with a grab box to my blog. Hope you like it!

Tuesday, 24 July 2012

Surfboard Signs Tutorial

Let's go surfing now, everybody's learning how, come and make a sign with me...


I am back in England now as you may have seen from my last post. I am missing the beach already but am loving the weather that followed us from California! And we have surfboard signs to remind us of our great sunny summer...and a tutorial on how to make surfboard signs for you.


I must say that although I'm writing this tutorial, I had help making these from my mom and dad. They're the ones in the pictures below and have their own blog, Jerry & Kay. They'd love for you to visit it if you haven't already. :-)


Now, here's how you can make your own surfboard sign...

What you need:
1. Surfboard Template and Wood (we used craft wood from Lowes)
2. Primer, Outdoor Paint, Spray Fixative, Foam Paintbrushes 
3. Saw or even better...Someone to cut the wood
4. Alphabet Stickers and Stencils
5. Acrylic Craft Paint & Palette
6. Small Paintbrushes (we used sizes 0, 3/0, 5/0, and 10/0)

Trace the template onto the wood. Cut the wood. Sand the wood. It was perfect to be staying with my Dad because he's great at this part of the process and I don't have any of the tools at my house in England.
 After the wood is smooth, prime it and paint it a colour of your choice. We used outdoor paint for the signs that will be in the garden and craft acrylic paint for the indoor signs. We painted two or three coats, depending on the colour and how it looked after the second coat of paint.
After the paint dries, spell out your names/words with the alphabet stickers. Then embellish with your fabulous artwork. For ours, the kids had special requests... 

Evangelyn: a Hawaiian girl and lots of flowers.
Corey: a palette on the left with all the paint colours, some paintbrushes next to it & an easel on the right.
Henry & Canaan weren't as specific with their request of turtles and fish.
Lily's was a gift, so she didn't put in a special request. :-)

We sketched some pictures and found some others on Google, then transferred the images onto the surfboards (you can see how here). Then we painted them carefully with our tiny paintbrushes. We started with larger (but not very large) paintbrushes but immediately realised that we needed ones that were much, much smaller in order to get the detail that we wanted. So, once you have your tiny paintbrushes, you can paint with acrylic craft paint. You're almost done!

Time out for this little guy...maybe not so little is a better description. He was really attracted to our painting palette...and we were a little loony from the paint fumes & skinny girl, so I had to get a good picture of him...but then he flew away.
Okay, back to the tutorial. We painted our garden signs slightly differently. My dad suggested painting a line down the centre, which was an idea that we loved! You can use some masking tape to create a thin line down the centre of the board. I suggest about a 1/4 inch space between the two pieces of tape. Then, use a stencil brush to paint on the colour of choice.


Next, choose what you want your sign to say and arrange the alphabet stencils in the correct order. Tape them down so they don't slide around while you're painting...and paint! I used the top edge of the bottom piece of tape to make sure my letters were in a straight line and then used smaller pieces of tape to secure the bottom of the stencils. After the paint is slightly dry, peel the tape off very carefully.

After the paint is completely dry, you can attach a hanger (I don't know the real name for these) to the back of the boards so they can be hung on a wall. We did this for the name boards.

Or

Attach a post to the board with a hammer and nails. I kind of wish I had done this before painting and stencilling so that the paint would cover the nails. Oh, well...next time!

Lastly, spray the boards with a protective spray.
 

Done! 

'Pray 4 Surf' is for our garden in England. 'Surf's Up' is for my mom, my brother's family, and my mom's neighbour. 

The pictures on the boards met all the expectations of the kids and they loved them!

Best of all, my mom, dad and I made some great memories throughout the saga of making the surfboards...

...and I get to think about those memories every time we glance at the signs in our gardens & on our walls! 

If you make a surfboard sign from my tutorial, I'd love to see it! You can post a pic at my Share with Sunny Stitching flickr group.


Friday, 20 July 2012

Friday Foto - Torch (29 of 52)


Olympic Torch
Friday, 20 July 2012
Guildford, UK

One of the great moments of my life was seeing the torch today!


Thursday, 19 July 2012

Surfboard Signs and Train Piñata

Finally finished! 
My mom and I spent one more day last week finishing our surfboard name signs. 
These surfboard signs felt like a never-ending project and at times our eyes went a little cross-eyed, but they were well worth the effort and we loved the result. My kids, niece and nephew loved them, too...which is most important since the signs are for them! They were all very specific about what they wanted on their signs and I think my mom and I did a great job at personalising them to perfection!


I also completed another homemade piñata. This one's a train piñata for my nephew. 

He asked me to make him a piñata for his birthday and I could not say no to his big puppy eyes and sweet smile. So, I made it on one of my last days in California. I kept wondering why I waited to the last minute to make it, but surprisingly finished it in one afternoon/evening. It took about 8 hours to make inclucing a few interruptions like dinner and bedtime for the kids...much less time than the donkey piñata and star piñata! I was very careful to keep it small...but also made sure to fill it with loads of candy! My nephew was so excited when he saw it the next day. He jumped up and down about ten times, saying "Thank you! Thank you! Thank you!"

I'll have tutorials for both of these up soon, so stay tuned if you'd like to make either one for yourself! 


Saturday, 14 July 2012

Friday Foto - Marilyn (28 of 52)


We went to the Sawdust Festival in Laguna Beach last week and saw loads of beautiful & unique handmade items. If you're in the area, you've got to go! Nikki of Laguna's stall is a must stop for me. She's an old friend of my parents and makes gorgeous earrings and necklaces. I have a hard time not buying one of each when I visit her stall. This year, I loved her display. She had posters of Marilyn Monroe 'wearing' her handmade earrings and necklaces. This one with the pink hair & lips was one of my favorites.


Jean Pocket Purse Tutorial

Here is how to make a purse out of a jean pocket because you promised your little girl & boy you'd make them each one to use tomorrow at the Sawdust Festival...and you can't break your promise!

Totally worth staying up until after midnight...
My mom (Kay from JerryandKay) made the one for my little guy. My favorite quote of the night was when she said, "I've never seen Jimmy Kimmel before!" We laughed a lot after midnight.

Okay...if you want to make a purse from a jean pocket, here's how you do it...

First, gather your materials...

1. Old jeans  2. Rope, Ribbon, or Something long & narrow for a strap  3. Thread & Needle
4. Beads (optional)

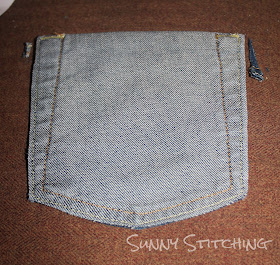
 Cut out a back pocket from the jeans. Make sure you cut out the entire pocket, not just one side of it.
Then fold over the top and trim it to a length that you like. I cut mine along the stitching so it's a diagonal.

 Flip the pocket over and trim any excess fabric that may be sticking out at the sides.
Now, the really fun part...choose a button. Make sure you have plenty to choose from and a second opinion (mom) or a third opinion (dad) always helps, too! Especially, when the second opinion comes from the person who is making my little guy's bag (my mom, of course...she's got the best selection of buttons!).

 Once a button is selected, place it in a good spot.
Draw a line on the good spot and make sure it's the same width as the button. Carefully cut along the line to make a button hole. Then place a pin through the hole to mark where you'll sew on the button.


Get a friendly poodle to help you make sure your pin is in the right spot. Lift up the flap and put the button in the place of your pin.

Next, take three strands and thread them through a needle.

Sew the button securely in place. 
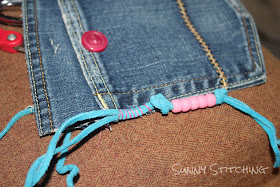
Now it's time to sew the straps on. After threading and knotting the end of a needle, stick the needle into the inside of the pocket and out through the side, then through the strap. This will keep the knotted end in the pocket and out of sight.

 Whip stitch the strap to the side of the purse. You can see that before I sewed the straps on, I strung some beads between two knots to add a bit more color to my little girl's purse. She loves pink. 
After the strap is securely stitched on to the purse, knot the end of the thread. Then push the needle back inside the pocket and then out after 3/4 inches or a couple centimeters. Pull the thread completely out and clip it very close to where it comes out of the fabric. This will hide the end of the thread inside the pocket. 

Stitch the other end of the strap onto the other side of the purse the same way.

Now, you've got a cute pocket purse for your kid to carry...or for yourself...or for someone else that you love! 


 She loved hers and carried it all day!

 She thought it would make a good backpack, too!


If you make one, I'd love to see it! 
Feel free to add a picture or two to my flickr group, Share with Sunny Stitching